
How to Organize Your Field Recordings - a revised method
Hi! Wow - it has been a long while since I wanted to share my updated process of organizing my recordings. You might remember I had an article in two parts about this crucial process. From the feedback I received - and thank you to all of those who shared it - it looks like it has helped a good number of people.
Since I wrote it I had more field recording trips and have been recording much more in the region where I now live. I kept my practice by those principles and followed many of the steps, but there were a few things that were not working well for me. Those had to do with unnecessary redundancy and rigid order that either bored me or didn’t allow for fast deliveries when needed, causing chaos between sessions and folders.

My first field recording trip to the Atlantic Forest in Minas Gerais which rendered me hundreds of files. That's when chaos installed.
So what I’ll be doing here is pretty much an updated version. I’ll still derive some information from the older articles and make comparisons when plausible. I won’t talk about the UCS here as it’s not the purpose. We’ll deal with:
essential data
backups
folder structure
recording notes
creating an easy to understand DAW session to use forever
There is excellent and broad information relative to this topic, shared by other pros who have been doing it for decades, which I strongly encourage you to check out, if you haven’t already. Paul Virostek’s book Field Recording – From Research to Wrap was an eye-opening in terms of how to think and categorize field recordings.
OK - let’s go!

Unrelated but cool photo
In the field
The biggest, biggest mistake one can do in the field is forget to press the REC button. The second one, for me, is to assume that I’ll remember details of: exact location, setup details, microphone orientation, date & hour.
The way to solve that is to be very diligent with the file naming system directly on the recorder. So, if possible, date and starting time is what I want to have on the recorded audio file, so there will never be any doubts about that. This merely implies that, before I reach the place, I have those already set, so that I don’t have to stress about it once I am there because sometimes it happens that we need to start recording immediately. There is no “solving it post” even for this.
Then, once there, slate it. Just do that. I like to summarize how the soundscape feels, how my microphones are orientated, which technique I am using, gain, HPF.
Next is to save the place’s coordinates under a list on Google Maps. Along with the notes, I like to snap a picture which, usually also records the coordinates, if location is enabled. Redundancy here is not a bad thing. The timecode I use is the local time of the area I am in.
After the recording session
Ok, we have our stuff. We backup.
In the previous method, I’d backup to a separate hard drive and leave the files there only to use a second instance of copies on a working hard drive. Here’s what I am doing differently this time: my first step is to copy the recorded files on the memory device to the working hard drive. I create a folder called 1_FR_Location Name_Original Files. While that is going on, I enter all the data I want in a spreadsheet. For me, those are:
file name
date & time
length
location name
coordinates
altitude
anthropophony
main species
ultra frequency content
picture's file name
atmospheric conditions
dB measurement
recording techniqu
gear used
HPF
observations
There has been one mistake I accidentally fell into a few times which was to derive date and hour information from the copied files, instead of the original ones on the SD card; I was looking at the ‘creation date’ field of the folder browser which was giving me the date of the creation of the copy. Very different story. I’m still paying the price for this in older projects.
I can’t stress enough how important it is to enter this information immediately and properly. I know it can be tedious, but it really is the best thing one can do.
Now, here, of course, if there have been recorded files that only had a few seconds or few minutes and are absolutely useless, I delete them immediately from the folder to which the original ones are being copied. Having a clear cataloguing system on a spreadsheet and a sense of confidence in this method will avoid me wondering a couple of years later if I lost any file because the naming sequence seems to have jumped a few files.
Listo! - so now we have one clean backup and all the basic data we want. For me, this is already a huge motive for celebration! And you should too because once these steps are done, we already dodged many headaches and time consuming avoidable work in the future.
If you remember the process on my previous method, I would now create another copy to a folder with the suffix -RX which indicated that those files, once worked through, have been fully listened to, had markers placed for species ID and indications of cuts (say, for a vehicle passing by or that kind of disturbance). Now I think this is not the best idea. A part of this thinking is that I was trying to be very purist (what a ridiculous word for editing out anthropogenic noise, by the way) and only keeping “pure nature sounds”. Now I think differently, which is subject for another article, maybe, but I don’t want to have any cuts directly on the files I am working on.
Therefore, instead of going through each file first on iZotope RX, I create a session on my DAW (which is Reaper) and I send all the files there. Just like before, I organise them by day and place them in a 24-hour timeline.

An overview of a location I recorded in 2021 throughout 4 months
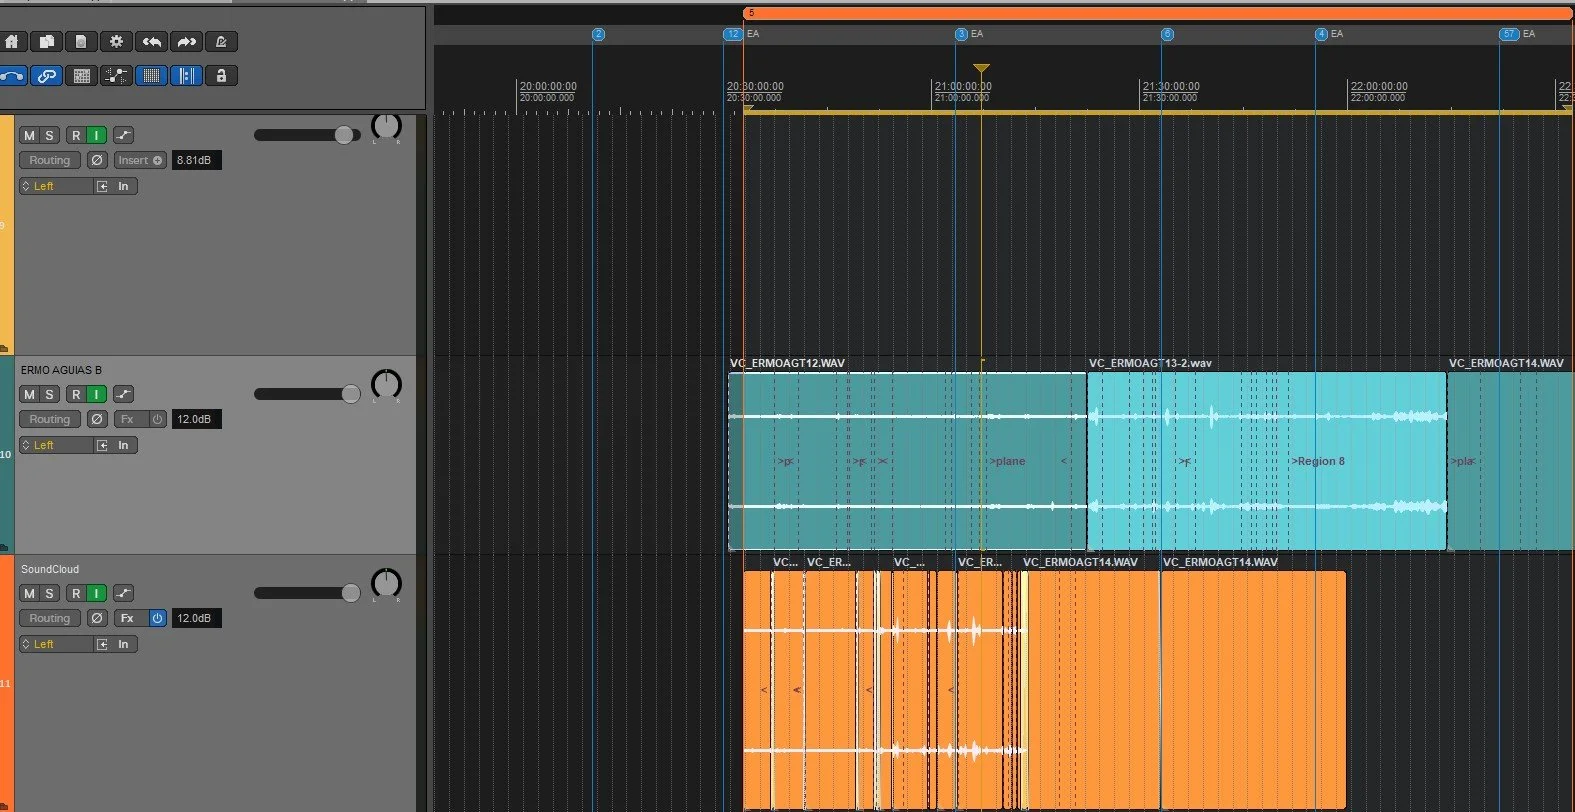
As the picture shows, I have one track per day of recording, in order, and each audio file starting at their own original starting time. The markers on top stay at the start of the file and their ID number corresponds to the number of each file’s numbering system. The colour scheme also helps me out: the original material - both the audio clips and their markers - have one colour (green in this case). Later on, the regions that have been exported to different platforms or projects have their own colour as well. For me this is the best way to always know and to keep track of what I have done with certain audio segments, which I find really important on the long-term. Sometimes I am asked for exclusive material, or if I want to diversify what I publish between soundcloud, earth.fm or what goes into my bandcamp albums, then with the region system and a track assigned to each of these platforms (as you see earth.fm in yellow on the bottom of the track list). But more on this later.
Once all the tracks are beautifully and orderly displayed in the session, I start opening each one on iZotope RX. iZotope is set as my secondary editor on Reaper.

And now, yes, it’s time to listen to the whole file and place my markers and regions. I have only two rules: regions for noise (planes, vehicles, maybe me sneezing in the distance) and markers for species ID. I do this because markers and regions show up differently on the Reaper’s editing window which helps me to navigate the audio clips better. And while I am doing that, I have a notebook and a pen by my side and I take whatever notes I find useful although I focus more on subjective aspects, such as a beautiful passage or a very impressionistic moment, like a really outstanding reverberation or an interesting tonality. Since I consider what I do more close to sound art rather than an archive of field recordings, I like to let myself guide by these felt impressions. I may also take note of the loudness and dynamic range here.
To be clear, I don’t do any processing at all at this stage, I just add the time-stamped information.
Once the file is properly listened to and has the necessary notes, then, yes, I copy it as the original file to the determined folder in the ‘Field Recording Originals’ hard drive. This allows that each iteration of the recording file contains all this data but it’s unprocessed.
As you know, this process might takes several days. But consider the situation in which what you recorded last week contains some material you want to use for something urgent, so perhaps you haven’t even started doing species ID and listening through attentively to everything. However, your DAW session already has all the audio clips lay down nicely and you are immediately able to mark what you’ll take right now. At any point you can listen to that file again and do your necessary notes without ever have to go back and forth.

This is how the folder structure is looking like now:
01_FR_Andalusia_originals is where the original files go immediately and which changes are saved to after taking time-stamped notes on the file itself.
02_FR_Andalusia_ID contains the snippet I export from the original file in order to bring it do BIRDnet or show it to someone who can help me. These are identified with the track name, exactly as the original, plus ID-nr. When the species are correctly identified, I add their name to the end of the file as well as to the marker on iZotope RX, so I always know where it comes from and that each instance is identified. I had too many loose ID snippets that I didn’t remember any longer which bird was it. In the end it might also serve as a mini-catalogue for species I didn’t know of then.
03_FR_Andalusia_session is of course where the Reaper session goes in, with all the backup and peak files.
04_FR_Andalusia_exports is a folder that usually contains sub-folders for the platforms, projects or clients I exported for.
It has some finesse detail but it’s also pretty simple.
Let’s go back to the DAW session now and look at it with some more detail about how I handle the audio clips there.
The main idea is that the original audio files don’t suffer any direct editing or destructive processing. We always want them intact so we can always go back to them at any point. In order to keep up with this, I create an adjacent track for the purpose intended (let’s say an export to soundcloud). In this new track, I’ll simply copy the audio clip from above to make my edits without affecting the main tracks. See in the picture below how I use a region at the top to tell me the length of what has been used from a recording and the edited clips below.
Even if I would prefer to transfer chosen segments / tracks to a new session - like in the case of my last album - I will still mark with regions what has been taken from the original set of recordings.
And that is it! Even if it’s a process that takes time, it has so much more flow, it takes less space, and it’s a bit more fun to work with. I have been feeling much more comfortable working like this.
Let me know if you have thoughts or suggestions and thanks so much for reading.